The post Superhero Mask For Your Little Hero appeared first on A Mouse In My Kitchen.
]]>
In case you haven’t noticed, a lot of our crafts are focused on little boys and their hero obsessions. Both Traci and I were blessed with little boys as our oldest children. Don’t worry, we both had girls second so there will be plenty of girl themed tutorials to come, I’m sure.
A little while ago, I made a superhero cape for my little man. I decided to make the superhero mask to go along with it! This was super cheap and it only took me about 15 minutes. No special tools required, not even a glue gun or a sewing machine.
Here is what you need:

- 1 piece of felt
- scissors
- a needle & thread
- elastic
- measuring tape
- something to mark the felt with (I used a washable dry erase marker.)
So I have to confess that I don’t have a measuring tape right now. It’s in storage, along with my sewing machine. So I used the next best thing – yarn. I just measured my little guy with some yarn and used that as a gage for cutting the pattern.
I measured my guy across his face where the mask would go, lengthwise along his nose, and all the way around his head. The measurements made it easier to make this while he was sleeping.
So I drew the mask onto the felt. I just kind of guessed based on what a superhero masked looked like in my head. Nothing precise here at all. In fact, the first mask I made ended up fitting me… so I made a second one a bit smaller. You can easily make three masks out of one piece of felt, so I felt like it was okay to mess up the first time.

Once I had the mask cut out, I cut some holes for the eyes. Remember that little kid’s eyes are super close together! You might even want to wait until you can hold the mask up to your guys face to cut the eye holes. That way you can be sure they fit.
It’s really nice to have GOOD scissors when you do this. The only scissors I have in my house right now are kitchen scissors. You know the kind that only have about a quarter inch of cutting ability on the blades? Yeah. That was fun.
Once you get the mask all cut out and the eye holes cut out, cut your elastic and sew it on. I just kind of went crazy with the thread. I doubled it up to give it a little more strength and used a matching color so you can’t see it.
Be careful while you’re sewing on the elastic to keep it straight. Mine kept wanting to turn on me.
That’s it! I hope your little superhero enjoys his (or her!) mask!

Share
The post Superhero Mask For Your Little Hero appeared first on A Mouse In My Kitchen.
]]>The post Reversable Super Hero Cape Tutorial appeared first on A Mouse In My Kitchen.
]]>
A little while ago, my mother bought my son a pair of Batman pajamas that have a velco cape. My little guy LOVED it. He wanted to wear it all the time. That’s totally fine with me, except that it only velcoed onto the one shirt. Every so often, the thing has got to get washed. I remembered that when I was little, my grandma had made a super hero cape that my brothers and I loved. I decided that I would make one for my kids.
This project involves a little bit of applique which can be a little intimidating to some, but I find that if I use a little heat n’ bond, it is much easier.
Let’s get down to business.
Here are the supplies you need:
1 yard each of two different fabrics
1 square of velcro
heat n’ bond
sewing machine
scissors
an iron
Here is your pattern. It’s pretty crappy, but you get the idea:
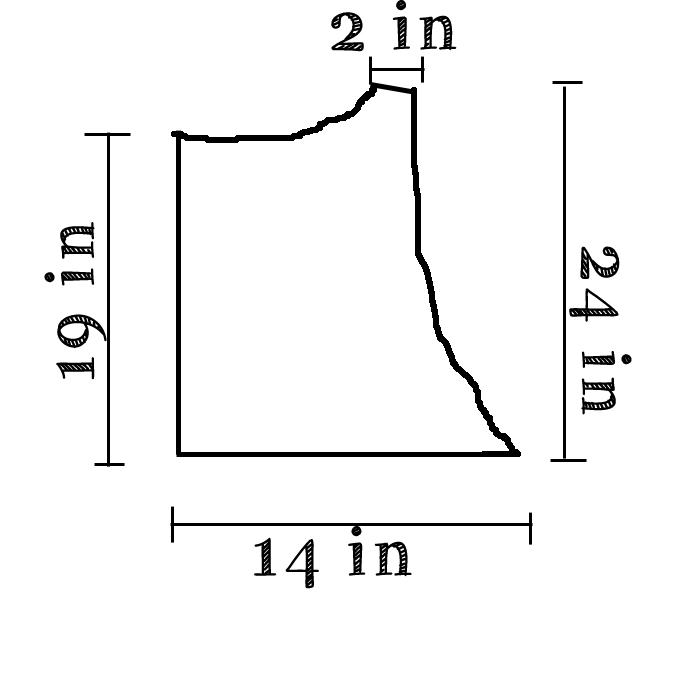
Fold your fabric in half. Using the pattern to measure and cut out the material. You are cutting only half of the cape, so don’t cut along the folded side.

Do the same thing with your second fabric. Use the first piece as your pattern so they are the same size. You should end up with two piece of fabric that each look like a cape.
Cut a square a little bigger than the symbol you want on the cape. Iron the heat n bond to it. To do this, make sure the paper side of the heat n bond is up.

Put it on top of your square. Don’t pull apart the heat n bond at this point. Iron using medium heat. Do this to a square of both colors of fabric.

Cut out your symbols. I went with an A because it is the first letter of my little guy’s name. On the other side, I used a star. I didn’t use a pattern at all, I just used chalk to draw it out and cut it. It’s not perfect, but I wanted it to look that way.

Peel the paper off of the heat n bond. Place the symbol onto the cape fabric. Make sure it is place correctly, and then iron it on. Do the same with the other side.
Your next step is to sew on the applique. Go slow and stay as close to the edges of the applique as you can.
After your applique is sewed on, it’s time for the velcro. Put one piece on the top right of each cape.

Once you get the velcro in place, pin both sides of the cape together, wrong sides facing in.

Sew them together, but make sure you leave a hole big enough for you to be able to turn it right side out.
Turn it, and sew the hole up.

Enjoy your cape!
Looking for more dress up tutorials? Click here.
ShareThe post Reversable Super Hero Cape Tutorial appeared first on A Mouse In My Kitchen.
]]>The post Birthday Crown {Or Dress Up, too!} appeared first on A Mouse In My Kitchen.
]]>
My little lady turned one a few days ago! AH! Really!? So we did a sweet little party with friends at the park {more on that later}. I wanted to make her a pretty little headband, but the little miss will NOT keep them on. She will wear hair bows, but not headbands. {But really, who can blame her? Headbands are so super uncomfortable} Anyway! I saw a few different lace/felt crowns, and decided to make one up that could also be put in our dress up box for later! It was super simple, and I used things I already had in my craft mess {er…box}.
So here’s what you need:
-Felt {I used two different colors, just for funsies, and that is what I had. I got these two sheets at Michael’s for 50 cents, but I know you can also get felt at fabric stores by the yard, and then you wouldn’t need to piece it.
-Good sewing scissors. No joke, when you cut felt, bring out the fabric scissors, paper ones won’t cut it {ha!}
- Needle and thread {I used regular sewing machine thread, and layered it, but getting thicker thread would be a good idea, I just wanted to use what I had on hand}
-Measuring Tape
-Glue Gun {optional}


Step Two: Trace the pattern onto your felt {I used my pattern on two pieces of felt twice {traced it on twice} and then sewed them together using a cute stitch {coming up next} if you have one piece of felt, just trace it as long as you need it, and adjust the pattern accordingly.}The above picture is an example of my pattern, you can get it here!
Step Three: Cut out the felt!
Step Four: Connect the two pieces of felt using what is called “the blanket stitch”. Make sure to layer your thread. You want the stitch to show up on the felt, so you need to have a few layers. I had four strands as I hand sewed it and I think it was just right. Layer your thread four times and knot at the bottom, and then make sure all four strands go through your needle eye.
Here are a few different tutorials I used for the blanket stitch. It’s really simple once you get the hang of it, and looks so darling!
First is a video, because I need to SEE it happening sometimes:
and another link that is pictures {if that is easier for you!}
I sewed this blanket stitch to connect the crown together, and to make it decorative {Do this same stitch around the top spikes and around the bottom.}
I then sewed on a sweet little heart {Cut out of felt} And a button. I think the number for their birthday would be really cute, too. I sewed AND hot glued the heart and button on because my little one loves to tear things apart, but sewing it on would probably be just fine.
Happy Sewing!  {Let me know if you have any questions!}
Traci
Want to see other dress up tutorials? Click here.
ShareThe post Birthday Crown {Or Dress Up, too!} appeared first on A Mouse In My Kitchen.
]]>