Category Archives: Yummy

Recipe 5: Spicy Coconut Baked Chicken Tenders

So I got the idea for this recipe from Our Best Bites. I really love their cook book. A lot of the recipes seem like they are going to be hard, but end up being super easy. Anyway, in their cookbook, there is a recipe called Coconut Chicken Fingers. I modified that a little to make these. These were easy and quick and they taste awesome. They took less than 30 minutes to make and then they cooked for 20. My husband is always trying to get me to deep fry breaded chicken, something I am not a huge fan of (mostly because I ALWAYS get burned). These are a good alternative and I don’t have to deal with the hot oil.

Here are your ingredients: (this makes about 12 chicken tenders)
1 cup sweetened coconut flakes
1 cup Italian bread crumbs
2 teaspoons garlic salt
3/4 teaspoon curry powder
1/2 teaspoon dried onions
1/4 teaspoon cayenne pepper
3/4 cup flour
3 eggs
12 chicken tenders (*I have done similar recipes with chicken breasts too. Just cut them into strips and make sure they are thin enough that they will cook all the way through)

So your first step is to put foil on a pan and spray it with some kind of non stick spray. Set it aside, but keep it some what handy. Preheat your oven to 450 F.

Breading mixture (before it was actually mixed)

Next, mix the coconut flakes, bread crumbs, and spices in a shallow dish. The cook book suggests chopping the coconut to be the same size as the bread crumbs but… I didn’t. And it was fine.

 Put the flour in a second dish and the eggs in a third one. Whisk the eggs.

Take your chicken tenders and place them in the flour. Cover each side with flour. Then, put them in the egg dish. After you cover them in the eggs, put them in the breading mixture and roll them around making sure they are covered in that. Lay them flat on your baking sheet.

In order to make them more crunchy, I drizzled them in olive oil as the book suggested.

I stuck them in the oven for 15 minutes. My chicken tenders were pretty small, so they were done at 15, if yours are big it might take longer. They should be golden brownish when they are finished.

These are amazing dipped in honey. My husband and I ate almost all of them by ourselves.

Share

Recipe 4: Honey and Oat Bread

Once a month our church does a potluck dinner. I love it because I usually get a chance to make something that I haven’t made before or that I haven’t made in awhile. Today though, I decided to do something that I have made many, many times. And I have to say (not to brag or anything) but it was a HUGE hit.

I love making bread. There isn’t really anything that compares to the smell and taste of home made bread. My husband loves it, I love, my kids love it. I used to just follow the recipe in Better Homes and Gardens New Cook Book: Food Gifts from Your Kitchen (Better Homes & Gardens Plaid) for basic white bread, but after awhile I decided I should venture out. I tried different things experimented in different ways, and have come up with a recipe that I absolutely love. I call it Honey and Oat Bread (catchy, right?) Here are the ingredients you need:

5 3/4 to 6 1/4 cup all purpose flour 1 package dry yeast (2 1/4 teaspoons) 2 1/4 cup milk 2 tablespoons of sugar 1 tablespoon butter 1 1/2 teaspoon salt 1/2 cup honey 1 cup oats (note: I doubled the recipe when I made this so if it looks like I have WAY more than you, it’s because I do.)

The first step is to mix 2 1/2 cups of flour and your yeast together in a large bowl. The next thing you do is heat the honey, milk, butter, sugar and salt in a saucepan.

 The original recipe says to heat it until its 120 degrees, I just heat it until it all mixes together good and the butter is melted. It should be super hot, just warmish.

 So the next thing you do is pour the milk mixture into the other bowl. Now you mix it with an electric beater. As you can see in the picture, I cheat.

I have a Bosch Universal Plus Kitchen MachineI have to admit that if I didn’t have this, I probably wouldn’t make bread. This thing is amazing. I one time quadrupled this recipe (made 8 loaves at once) and the mixer handled it like a champ. Anyway, if you don’t have a bosch, beat it with an electric mixer for about 30 seconds. If you do have one, I put the bread dough hook in and beat it for the same amount of time.

 The next step is to add your oats. Just put them in and mix it up.

 The next step is to add the rest of your flour in (3 1/4 to 3 3/4 cup more). I have noticed that if I double recipes, I often need more flour than double. Just add flour until it doesn’t feel super sticky. It can be a little sticky, but not very.

 This next step is where the mixer comes in handy. If you have one, just turn the speed up to 3 or so and let it kneed for about 8 minutes. If you don’t, take it out of the bowl and kneed it by hand for that same amount of time. After you are done kneeding, lightly grease a bowl and put the dough in it.

 Cover and let it rise for 45-60 minutes (the dough should about double in size).

 After your 45-60 minutes is up, punch the dough down. This pretty much means exactly what it sounds like. Stick your fist in the middle of the dough and push down. It will feel like you are “letting the air out.” Then pull the dough out of the bowl and divide into two parts. Set it on your counter and cover for another 10 minutes.

 After that 10 minutes is up, grease your bread pans.

Your next job is to shape the dough into loaveish (yes, that’s a word, I just made it one) shapes. The cookbook has detailed instructions on how to do this, I just kind of make it into a long bread looking thing and stick it in the pan. Then, cover them yet again and let them sit for another 30 minutes or so, preferably in a warm place.  (note the fire)

 While they are rising, preheat your oven to 375. When they have finished rising that last time, place the loaves in the over for 35 minutes. As soon as they come out, brush some butter on the top of them. Sometimes I put some herbs on top of them too, but not usually. Sit back and enjoy your master piece.

Side Note: This bread freezes really good. I have frozen loaves for 2 months at a time. I just put it in a grocery bag and stick it in the freezer. The night before we want to eat it, I pull it out and let it thaw.


           This one has a face :) –>

Share

Recipe #3: Basil Carrots

So this is just a little side dish that I wanted to post up here because it is a special recipe in my house. For one, its one of the only ways I can get my 20 month old to eat carrots. The second reason is that the recipe is one that my husband’s grandmother makes and is a childhood favorite of his. It is really easy and super good.

Before I get started, I just thought you guys might like to know that the mouse is still running rampant in my kitchen. He (or she) took the peanut butter off the trap and survived. So, he (or she) lives to see another day.

Anyway, on to the carrots. The first thing I do is wash and peel the carrots. Peeling them is not essential, but I like them better that way. And I think they cook a little faster. I also cut them up pretty small to increase the cooking speed. Also, the carrots shrink a LOT when you make this. I try and do  three or four big carrots per person.

Once that’s done, heat up your oil. My husband likes it better with butter (who wouldn’t?) But for the sake of being healthy, I am using olive oil. When I do use butter, I use a LOT, usually an entire stick.

 Side note: I have to do a little highlight on my pan. I absolutely love this pan. It is a Lodge Color Skillet, Island Spice Red, 11″ My husband bought it for me for Valentine’s day the first year we were married. It stays on my stove all the time and I probably use it 5 times a week. It is super easy to clean and I feel like food tastes better when I use it.

 Anyway, back to the cooking. Heat up your oil until it makes the splashy noise when you flick water onto it. I hope you know what I’m talking about because that was a horrible description. Anyway, once it’s hot, put in your carrots and basil. I don’t measure the basil, I just pour a bunch on it. I don’t really think you can do too much. Fresh basil is better, but if you don’t have it dried basil works fine. Make sure your heat is around mediumish. Cook it for about 20 minutes, stirring every so often. (the longer you cook, the softer they are. My 8 month old really likes these but I have to cook them FOREVER for them to be soft enough for her. Once the carrots are soft, you’re done!

Basil Carrots
Easy side dish that everyone will love
Write a review
Print
Prep Time
10 min
Cook Time
20 min
Prep Time
10 min
Cook Time
20 min
Ingredients
eight carrots
three tablespoons olive oil
three tablespoons basil
Instructions
Cut the carrots up small
Cook the carrots with basil over medium heat in the olive oil for twenty minutes or until the carrots are soft
Notes
Butter can be used instead of olive oil
A Mouse In My Kitchen /
Finished Product 
 
Share

Recipe 2: Quinoa and Veggies

So a little while ago, I discovered Quinoa. I may be one of the last people to discover this gem, but it has changed my life. Okay, maybe that’s a little dramatic, but it is really good. I’m not exactly sure what it is… I believe it is some sort of a grain? I guess I could do a little research but that takes time. All I know is that it is good for you and really easy and yummy. And, it is NOT pronounced kee-no-ah. The grocery store guy made sure that I knew that it is keen-wa. I guess it is possible to cook it in a rice cooker, but I haven’t tried that yet. Apparently there are tons and tons of ways to cook quinoa. You can put in salads, muffins, cake, use it plain… and everything in between.

Anyway, this recipe is really easy. I love it for lunch. It makes enough for 3-4 people, but I’m the only one who eats it at my house so it gives me left overs, which I love.

So the first thing to do is wash the quinoa. Put it on a cheese cloth and rinse it off.

I have always cooked it with a bullion cube. I am sure it’s good without it, I just did it that way the first time and loved it so I do it that way every time. I cook one cup of quinoa with 2 cups of water and the bullion. Let the water boil, then turn it down and let it simmer until all the water is gone, about 25 minutes or so.

This is what it should look like when it’s done:

 If you look close, you can see that there is a ring around the outside of each piece. That tells you it’s done cooking.

Meanwhile, saute the veggies. I’ve used many different veggie mixes and they have all turned out good. This one happens to be asparagus stir fry. I saute it in coconut oil over a medium heat for about as long as the quinoa cooks so the veggies are nice and soft.

When it’s all cooked mix it together. My husband likes to eat it with soy sauce, I like it as it is.

According to fitwatch.com, if you split this into three servings, it is 354 calories. 
Quinoa and Veggies
Quick, healthy and delicious meal
Write a review
Print
Prep Time
10 min
Cook Time
20 min
Total Time
30 min
Prep Time
10 min
Cook Time
20 min
Total Time
30 min
Ingredients
1 cup quinoa
2 cups water
1 chicken bullion cube
3 cups frozen veggies
2 tablespoons cooking oil
Instructions
Place water, quinoa, and bullion cube into a pot and boil according to directions on quinoa packaging.
Meanwhile, saute the vegetables in the oil.
When vegetables and quinoa are fully cooked, mix together and enjoy.
A Mouse In My Kitchen /
Share

Recipe one: Spinach Manicotti

I am setting off to embark on an adventure of cooking. Right now, I am your run of the mill, standard house wife cook. I cook so that my family can eat. I want to do so much more than that. I want to cook so my family can enjoy. I want to cook so my family can be healthy. And I want to do those things without breaking the bank. So, today I start.

I made Spinach Manicotti today. I really liked it. However, my husband was not a fan. But, he is pretty picky, especially when it comes to veggies. I had never used manicotti noodles and I have to say, I failed. Almost every noodle was broken by the time it got done getting stuffed. But, it tasted really good, and that is the important part. After I cooked it, my mother in law told me next time, don’t cook the manicotti noodles as long. Take them out of the pot a little before they are done and make sure there is enough liquid in the pan when you bake them so they will finish cooking. So there’s a tip for ya.

So, I got this recipe out of Better Home and Garden Cookbook, but I changed a few things. It’s interesting because I looked through my mother in law’s copy, which was printed about 20 years ago, and there is only a very small section on pasta and it is actually combined with rice. In my book, which is only 3 years old, there are tons and tons of pasta recipes. I think this has a lot to do with the fact that people used to think pasta made you fat. People are now figuring out that whole grain pastas are actually really good for you.

Anyway, on to the food. I didn’t take pictures of the process because honestly, it was a little difficult to make, let alone take pictures while making it. I am not a very good cook (yet), so I was a little overwhelmed making this meal, but in the end, it was worth it.
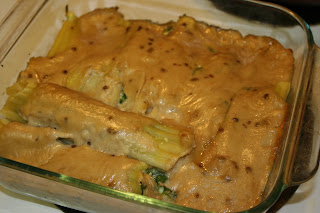
Here is the actual recipe that I used:
 
Ingredients: 
8 dried manicotti shells
a tablespoon or minced garlic
2 tablespoons butter 
2 tablespoons all-purpose flour
1 1/3 cup milk
4 ounce swiss cheese
1/2 cup chicken broth
1 egg, beaten
2 cups spinach, chopped pretty small 
3/4 cup ricotta cheese
1/2 cup grated Parmesan cheese
1/4 teaspoon finely shredded lemon peel
 

So the first step is to boil 8 manicotti noodles according to the directions. When they have cooked, take them out of the water and allow them to cool on a greased piece of foil.

While that is happening, make your sauce. The book tells you to saute 2 green onions and a clove of garlic in 2 tablespoons of butter. I didn’t have either of those so I used some minced garlic and omitted the onions all together. It still tasted really good in my opinion.

After the butter is hot and your onion and garlic are soft, you stir in 2 tablespoons of flour and 1 1/3 cup milk. Cook on the stove until its think and bubbly (it only took about 2 minutes). Then, add 1/3 cup chicken broth and 3 ounces of swiss cheese. It melts quicker if it’s torn into pieces. And for chicken broth, I boiled a bullion cube in a cup of water.

After the sauce got done, I just let it simmer while I made the filling. The recipe calls for 10 ounces of frozen chopped spinach that has been thawed and drained. I used fresh spinach. I don’t have a scale, so I just used a few handfuls. It was no where close to 10 ounces, but it was plenty in my opinion. I wouldn’t use a full 10 ounces, but that’s just me. Anyway, chop up your spinach and add 1 egg (beaten), 3/4 cup ricotta cheese, 1/2 cup grated Parmesan cheese, and 1/4 teaspoon finely shredded lemon peel.

So, after you have made the filling, if you have any noodles that are still in one piece, stuff them with it. If the noodles are broken, just kind of make do.. I just put the stuffing in it and turned it so the broken side was down. You can’t tell once its all cooked. Then, pour the sauce over it and bake it at 350 for 30 minutes. Let it stand for 10 minutes before eating.

Spinach Manicotti
Manicotti stuffed with creamy spinach filling
Write a review
Print
Prep Time
30 min
Cook Time
30 min
Total Time
1 hr
Prep Time
30 min
Cook Time
30 min
Total Time
1 hr
Ingredients
8 dried manicotti shells
a tablespoon or so of minced garlic
2 tablespoons butter
2 tablespoons all-purpose flour
1 1/3 cup milk
4 ounce swiss cheese
1/2 cup chicken broth
1 egg, beaten
2 handfuls spinach chopped pretty small
3/4 cup ricotta cheese
1/2 cup grated Parmesan cheese
1/4 teaspoon finely shredded lemon peel
Instructions
Preheat oven to 350
Boil manicotti noodles according to package directions. When they are completely cooked, take them out of the water and allow them to cool on a greased piece of foil.
While the noodles are cooking, make your sauce by sauteing the garlic in the butter.
Stir in flour and milk. Cook until thick and bubbly (about 2 minutes).
Add chicken broth and cheese. Let the sauce simmer until you are finished making the filling.
For the filling
mix together spinach, egg, ricotta cheese, parmesan cheese, and lemon peel.
Stuff the noodles with the filling and place in a 9X9 casserole dish.
Pour the sauce over the noodles. Bake at 350 for 30 minutes.
Let stand 10 minutes before cooking.
Notes
Onions can be added if desired. Also, it can be hard to stuff the noodles. If you put the stuffing in a ziploc bag and clip one corner you can pipe it in.
Adapted from Better Homes And Garden
A Mouse In My Kitchen /


Share